
Proper bed assembly ensures a sturdy and comfortable sleeping solution. While the process may seem daunting‚ following clear instructions makes it straightforward. This guide helps you assemble your bed efficiently.
1.1 Understanding the Importance of Proper Assembly
Proper bed assembly is crucial for safety‚ stability‚ and longevity. Incorrect assembly can lead to instability‚ damage to parts‚ or even injury. Ensuring all components are securely fastened and aligned prevents structural issues. A well-assembled bed provides optimal support and comfort‚ enhancing sleep quality. Always follow manufacturer instructions to avoid mistakes and ensure a durable‚ functional product. Proper assembly also protects your warranty and maintains the bed’s aesthetic appeal. Taking the time to assemble correctly guarantees years of reliable use and peace of mind.
1.2 Overview of Common Bed Types (Ottoman‚ Fabric‚ Wooden‚ Metal‚ TV‚ Sleepmotion‚ Sofa Beds)
Beds come in various styles‚ each with unique features. Ottoman beds offer storage‚ while fabric and upholstered beds focus on comfort and aesthetics. Wooden beds are durable and timeless‚ metal beds are sleek and modern‚ and TV beds integrate technology. Sleepmotion beds adjust for optimal comfort‚ and sofa beds combine seating and sleeping functionality. Each type requires specific assembly techniques‚ but shared goals are stability and comfort. Understanding your bed type ensures a tailored assembly approach‚ enhancing both safety and satisfaction.
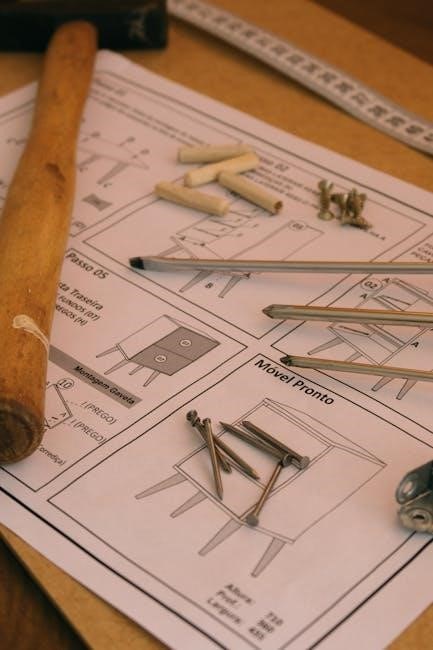
Tools and Materials Required for Bed Assembly
Essential tools include screwdrivers‚ Allen wrenches‚ and bolts. A clean‚ flat workspace is crucial for safe and efficient assembly‚ ensuring all parts fit securely together.
2.1 Essential Tools (Screwdrivers‚ Allen Wrenches‚ Bolts‚ Nuts)
The assembly process requires specific tools to ensure accuracy and safety. Screwdrivers (both flathead and Phillips) are essential for driving screws. Allen wrenches‚ often included with the bed‚ are used for securing bolts. Bolts and nuts are critical for stabilizing the frame. Always verify that all hardware is included and properly matched to avoid delays. Using the correct tools prevents damage to the bed components and ensures a secure fit. Keep tools organized to streamline the assembly process and minimize frustration.
2.2 Recommended Workspace Preparation (Soft‚ Clean‚ Flat Surface)
Preparing a suitable workspace is crucial for efficient and safe assembly. Choose a soft‚ clean‚ and flat surface‚ such as a carpet or a large mat‚ to prevent scratching the bed parts. Clear the area of clutter and ensure good lighting. Lay out all components and tools within easy reach. Consider covering the floor with a protective layer‚ like cardboard or a sheet‚ to avoid damage. Organizing the workspace beforehand helps streamline the process and reduces the risk of losing small parts or misplacing hardware.

Step-by-Step Assembly Guide
Start by unpacking and organizing all parts. Follow the sequence: attach side rails‚ install slats‚ secure the headboard‚ and assemble support legs. Proceed methodically for stability.
3.1 Unpacking and Organizing Parts
Begin by carefully unpacking all components from the boxes. Lay out each part on a clean‚ soft surface to prevent scratches. Organize hardware like bolts‚ screws‚ and Allen wrenches in separate containers. Cross-reference each item with the provided inventory list to ensure nothing is missing. This step is crucial for a smooth assembly process and helps avoid delays. Take your time to familiarize yourself with each part before moving on to the next step.
3.2 Attaching Side Rails and Support Legs
Position the side rails on a flat surface and align them with the bed frame. Use the provided bolts and Allen wrench to secure the rails tightly. Ensure all connections are firm to maintain stability. Next‚ attach the support legs to the side rails‚ following the manufacturer’s instructions. Double-check that all bolts are tightened evenly to prevent wobbling. This step is essential for creating a sturdy base for the mattress and ensuring the bed remains stable during use.
3.3 Installing Slats or Base Boards

Begin by laying the slats or base boards across the bed frame‚ ensuring they fit securely into the pre-drilled holes. Align each slat evenly‚ spacing them as specified in the instructions. Use the provided bolts and Allen wrench to fasten them tightly to the side rails. Ensure all slats are level and properly aligned to avoid warping or unevenness. Double-check that all connections are secure before placing the mattress. This step provides essential support for the mattress and ensures a stable sleeping surface.
3.4 Securing the Headboard and Footboard
Attach the headboard to the bed frame by aligning its mounting brackets with the pre-drilled holes on the side rails. Use the provided bolts and screws to secure it tightly. Ensure the headboard is flush with the top of the side rails for proper alignment. Repeat the process for the footboard‚ making sure it is evenly spaced and securely fastened. Double-check that all bolts are tightened firmly to prevent any wobbling or instability. This step ensures the bed’s structural integrity and enhances its overall appearance.

Common Mistakes to Avoid During Bed Assembly
Avoid skipping steps or not following instructions‚ as this can lead to improper assembly. Misaligned parts and missing hardware are common issues that cause delays.
4.1 Not Following the Manufacturer’s Instructions
Failing to adhere to the manufacturer’s guidelines is a common mistake. It can result in improper assembly‚ instability‚ or even safety hazards. Always read and follow the provided instructions carefully to ensure a secure and functional bed. Misaligned parts or missing hardware often stem from skipped steps or ignored warnings. Taking the time to understand each stage of the process will help you avoid costly errors and ensure your bed is assembled correctly for years of reliable use.
4.2 Missing or Misaligned Parts
One of the most common issues during bed assembly is missing or misaligned parts. Always verify that all components are included before starting. Missing hardware can delay assembly‚ while misaligned parts may lead to structural instability. Double-check each piece against the inventory list and ensure proper alignment by following the manufacturer’s diagrams. Organizing parts beforehand can help prevent confusion and ensure everything fits correctly. If a part is missing‚ contact the manufacturer promptly for a replacement to avoid further complications.
Specialized Bed Assembly Instructions
Specialized beds‚ like storage or adjustable models‚ require unique assembly steps. Always follow specific guidelines for ottoman‚ fabric‚ or sofa beds to ensure proper functionality and safety.
5.1 Assembling Storage and Ottoman Beds
Assembling storage and ottoman beds involves careful unpacking and organizing parts. Begin by attaching the base to the frame‚ ensuring all bolts are securely tightened. Next‚ install the hydraulic lift mechanism‚ which allows easy access to the storage compartment. Attach the mattress support slats to the base‚ ensuring they are evenly spaced for optimal support. Finally‚ secure the headboard and footboard‚ making sure all connections are stable. Always refer to the manufacturer’s instructions for specific assembly steps and safety precautions.
5.2 specific Guidelines for Adjustable and Sofa Beds
5.2 Specific Guidelines for Adjustable and Sofa Beds
Adjustable and sofa beds require precise assembly to ensure functionality. For adjustable beds‚ install the motorized base first‚ connecting it to the frame securely. Attach the side rails and support legs‚ ensuring stability. Sofa beds involve assembling the frame‚ attaching the mattress‚ and installing the folding mechanism. Always follow the manufacturer’s instructions for adjusting positions and securing hinges. Use a soft surface to prevent scratches and ensure all bolts are tightened properly for safety. Double-check the alignment of moving parts to guarantee smooth operation and durability.
Manufacturer-Specific Assembly Tips
Consult your manufacturer’s guide for brand-specific tools and instructions. Use recommended fasteners and follow tips for unique features like adjustable mechanisms or storage compartments to ensure stability and functionality.

6.1 Brand-Specific Instructions and Recommendations
Different brands provide unique instructions tailored to their designs. For instance‚ IKEA may emphasize using cam locks‚ while Wayfair might focus on pre-drilled holes. Always refer to the specific manual for your bed model. Brand-specific tools‚ like Allen wrenches or bolts‚ are often included or recommended. Pay attention to any unique features‚ such as adjustable mechanisms or storage compartments‚ which may require special assembly steps. Following these guidelines ensures your bed is assembled correctly and safely‚ maximizing its durability and performance.