The Canon Rebel T3i is an 18-megapixel DSLR camera offering high-quality images, Full HD video recording, and user-friendly features for both beginners and enthusiasts.
1.1 Overview of the Camera and Its Features
The Canon Rebel T3i is an 18-megapixel DSLR camera with a CMOS sensor, DIGIC 4 processor, and vari-angle 3-inch LCD. It supports Full HD video recording, manual controls, and a 9-point autofocus system. Designed for both beginners and enthusiasts, it offers intuitive features like Live View and creative shooting modes for versatile photography and videography needs.
1.2 Key Specifications: Sensor, Resolution, and Performance
The Canon Rebel T3i features an 18.0-megapixel APS-C CMOS sensor, capturing images up to 5184×3456 pixels. It supports ISO 100-6400, extendable to 12800. The DIGIC 4 image processor ensures fast performance, with continuous shooting at 3.7 fps. The camera also records Full HD 1080p video at 24, 25, and 30 fps for high-quality results;
Initial Setup and Basic Operations
Start by unboxing and familiarizing yourself with the camera’s components. Charge the battery, insert a memory card, and power on the device. Navigate the menu system and basic controls to begin capturing photos and videos effortlessly.
2.1 Unboxing and Physical Overview of the Camera
Unbox the Canon Rebel T3i to find the camera body, battery, charger, neck strap, and Eyecup. The camera features a sturdy build with a 3-inch LCD screen, mode dial, and intuitive buttons for navigation. The lightweight design includes a grip for comfortable handling, making it easy to carry and operate during shoots.
2.2 Charging the Battery and Inserting the Memory Card
Charge the LP-E8 battery using the provided charger until the indicator turns green. Insert the battery into the camera’s base. Use an SD, SDHC, or SDXC memory card (Class 6 or higher for video). Open the compartment on the right side, align the card, and push until it clicks. Ensure the card is properly secured for optimal performance.
2.3 Basic Camera Controls and Navigation
Familiarize yourself with the mode dial, multi-controller, and Quick Control button for easy navigation. Use the top LCD panel to monitor settings. The main dial adjusts shutter speed, while the multi-controller navigates menus. Press the Quick Control button to access settings quickly. Use the Live View button for previewing shots on the LCD screen.

Shooting Modes and Settings
The Canon Rebel T3i offers various shooting modes like Auto, Manual, AV, TV, and P, allowing users to control exposure settings for creative and precise photography results.
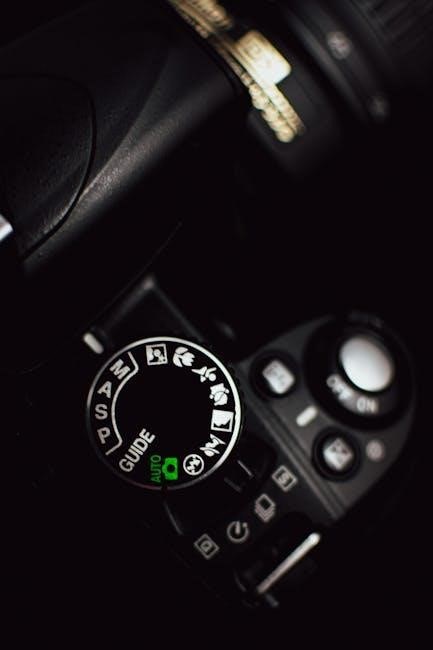
3.1 Understanding the Different Shooting Modes (Auto, Manual, AV, TV, P)
The Canon Rebel T3i features multiple shooting modes: Auto mode for simplicity, Manual for full control, AV (Aperture Priority) for depth of field, TV (Shutter Priority) for motion control, and P (Program) for balanced settings. Each mode offers flexibility, catering to different skill levels and creative preferences, enhancing photography outcomes effectively.
3.2 Adjusting Exposure Compensation and White Balance
Exposure compensation on the Canon Rebel T3i adjusts brightness by pressing the +/- button and turning the dial. Auto mode optimizes settings. White balance ensures accurate colors, with options like Auto, Daylight, and custom settings by capturing a white object for precise calibration, enhancing image accuracy and visual appeal.
3.3 Using Autofocus: Modes and Customization
The Canon Rebel T3i offers three autofocus modes: One Shot for stationary subjects, AI Focus for switching between stills, and AI Servo for tracking moving subjects. Use the AF button to switch modes. Customize autofocus by adjusting tracking sensitivity and acceleration/deceleration in the menu for improved performance tailored to your shooting style.
Image Quality and Customization
The Canon Rebel T3i offers high-quality imaging with options for JPEG and RAW file formats. Customize Picture Styles to enhance colors and contrast, tailoring your photos to your creative vision.
4.1 Setting Image Quality: JPEG vs. RAW
Choose between JPEG for smaller, ready-to-share files or RAW for uncompressed data, allowing greater flexibility in post-processing. RAW files capture more detail, ideal for professional editing, while JPEGs are convenient for everyday use.
4.2 Picture Styles and Their Effects on Images
Picture Styles optimize image processing for various subjects. Auto adapts to scenes, Standard offers balanced settings, Portrait enhances skin tones, Landscape emphasizes greens and blues, Neutral retains detail for editing, Faithful matches camera defaults, and Monochrome captures timeless black-and-white images, each providing unique effects to suit creative visions.
4.3 Configuring ISO Settings for Optimal Results
ISO settings control the camera’s sensitivity to light. Lower ISOs (100-400) are ideal for bright conditions, minimizing noise. Higher ISOs (6400-12800) are better for low light but may introduce grain. Adjust ISO based on lighting to balance image quality and noise, ensuring optimal results in various shooting scenarios.
Movie Mode and Video Recording
The Canon Rebel T3i offers Full HD video recording at 1920×1080 pixels and 24p, with manual exposure control for enhanced creativity. It supports adjustable ISO settings and customizable autofocus options, ensuring high-quality video capture in various lighting conditions.
5.1 Enabling Movie Mode and Setting Video Quality
To enable Movie Mode on the Canon Rebel T3i, switch the mode dial to the video position. Set video quality via the menu, choosing resolutions like 1920×1080 at 24fps. Ensure the video system matches your region (NTSC/PAL). Use a high-speed SD card for smooth recording and optimal video performance.
5.2 Manual Exposure Control During Video Recording
For precise control, enable manual exposure in Movie Mode by pressing the AV button. Adjust shutter speed, aperture, and ISO to achieve desired effects. Note that continuous autofocus isn’t available; switch to manual focus for consistent results. This feature allows advanced users to customize video settings for professional-quality output.
5.4 Best Practices for Shooting High-Quality Video
For high-quality video, use a tripod to ensure stability and minimize camera shake. Utilize natural light or external lighting sources for optimal brightness. Enable manual focus for precise control and use high frame rates for smoother motion. Invest in a high-speed memory card to support HD recording without interruptions.

Customizing the Camera
Tailor your camera to your preferences by assigning functions to custom buttons, creating personalized picture styles, and utilizing the quick menu for rapid adjustments during shooting sessions.
6.1 Assigning Functions to Custom Buttons
Customize your shooting experience by assigning frequently used functions to the camera’s custom buttons. Easily access settings like ISO, white balance, or autofocus modes through personalized button configurations. This feature enhances workflow efficiency and allows quick adjustments, catering to both beginners and advanced photographers seeking streamlined control over their camera settings.
6.2 Creating and Managing Picture Styles
Enhance your photography by creating and managing custom Picture Styles. Choose from predefined styles like Neutral, Standard, Portrait, and Landscape, or adjust settings such as sharpness, contrast, and color balance to create unique looks. Save your custom styles for quick access, ensuring consistent results and personalized artistic expression in every shot.
6.3 Using the Quick Menu for Faster Adjustments
The Quick Menu provides rapid access to frequently used settings like image quality, white balance, and ISO. Touch-sensitive navigation allows for swift adjustments, streamlining your workflow. Accessible during shooting or playback, it simplifies customization and ensures you never miss a shot while fine-tuning your camera settings efficiently.

Advanced Features and Techniques
Explore advanced techniques like depth of field, time-lapse, and continuous shooting. These features enhance creativity and control, allowing for professional-grade results in various shooting scenarios.
7.1 Using Depth of Field for Creative Effects
Depth of field controls focus areas, isolating subjects or capturing landscapes sharply. Use aperture settings (low f-stop for shallow depth, high for deep) to create artistic effects, enhancing composition and storytelling in your images.
7.2 Time-Lapse and Stop-Motion Photography
Time-lapse captures sequences over time, like sunsets, using interval shooting. Stop-motion animates objects by taking multiple photos of small movements. Use Manual mode for consistency, and consider external timers or software for precise control. Both techniques require patience and planning to achieve smooth, creative results.
7.3 Utilizing Continuous Shooting Mode
Continuous Shooting Mode captures multiple frames per second, ideal for action photography. Set it via the camera’s menu, then hold the shutter button. The T3i shoots up to 3.7 fps, great for sports or wildlife. Use a fast memory card and ensure the buffer doesn’t fill during long bursts for optimal results.
Troubleshooting Common Issues
Resolve autofocus errors by cleaning the sensor and recalibrating lenses. Fix exposure issues by checking histograms and adjusting settings. Address memory card and battery problems promptly for optimal performance.
8.1 Resolving Autofocus Errors and Improving Performance
Clean the sensor regularly and ensure lenses are free from dirt. Check AF settings and select the appropriate mode for your subject. Enable AF assist beam for low-light conditions. Use high-quality lenses and update firmware for optimal performance. Recalibrate lenses if focusing issues persist for precise results.
8.2 Fixing Exposure Problems and Understanding Histograms
Adjust exposure compensation to correct overexposed or underexposed images. Use the histogram to analyze brightness levels; peaks on the right indicate overexposure, while those on the left show underexposure. Enable highlight alerts to identify blown-out areas. Shoot in RAW for better flexibility in post-processing adjustments to achieve balanced exposure.
8.3 Addressing Memory Card and Battery Issues
Use high-capacity SD cards (Class 6 or higher) for reliable performance. Format cards in-camera to prevent errors. Ensure the battery is fully charged before use and avoid overcharging. Clean the terminals for better connectivity. Replace the battery if it no longer holds charge. Update firmware for optimal memory and power management.

Software and Firmware Updates

Install Canon’s EOS Utility for firmware updates, image transfer, and camera settings. Use Picture Style Editor for custom styles and ensure software is up-to-date for optimal performance.
9.1 Installing and Using Canon’s EOS Utility Software
Canon’s EOS Utility Software enables easy image transfer, firmware updates, and remote camera control. Download it from Canon’s website, ensuring compatibility with your operating system. Follow the installation guide for setup. The software supports RAW image processing and includes tools for customizing camera settings. A detailed user manual is provided for guidance;
9.2 Updating the Camera’s Firmware for Improved Performance
Visit Canon’s official website to check for firmware updates. Download the latest version and connect your camera to the computer using a USB cable. Follow the on-screen instructions to install the update. Firmware updates enhance performance, fix bugs, and add new features, ensuring optimal camera functionality and compatibility with accessories.
9.3 Transferring and Managing Images on a Computer
Connect your Canon Rebel T3i to a computer using a USB cable or card reader. Use Canon’s EOS Utility software to transfer images. Organize photos into folders and edit them using applications like Adobe Lightroom or Photoshop. Ensure files are backed up for safekeeping and easy access to your captured memories.
Mastering the Canon Rebel T3i requires practice and exploration of its features. For further learning, visit Canon’s official website and explore community forums for tips and resources.
10.1 Final Tips for Mastering the Canon Rebel T3i
Regularly practice and experiment with modes like Manual and AV. Refer to the user guide for detailed settings. Understand lighting and composition for better shots. Use autofocus modes wisely and adjust ISO for optimal results. For video, ensure stabilization and focus before recording. Explore Canon’s website and forums for additional tips and resources.
10.2 Recommended Reading and Online Resources
Download the official Canon EOS Rebel T3i manual for detailed instructions. Explore photography blogs and forums for tips and tricks. Visit Canon’s website for firmware updates, tutorials, and user guides. Check out online communities like Canon forums or photography groups for practical advice and real-world examples to enhance your skills.